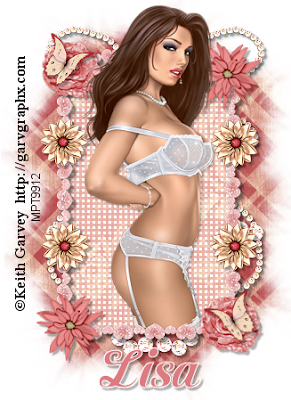
I am using the art of Keith Garvey which you can find HERE
You must NOT use this image unless you have the proper licence to do so, you can obtain a licence HERE
I am using the PTU kit Huggable by Rieneke which you can find HERE
Font of Choice
Mask of Choice
Open a new image 450x450
Copy n Paste frame 1 on your canvas
Image - Rotate - Free Rotate - 90 Degrees either way
Image - Resize by 50 and Sharpen
Place in the centre of your canvas
Grab your magic wand and click inside the frame
Selections - Modify - Expand by 5
Copy n Paste paper 14 as a new layer
Image - Resize by 60 - Sharpen
Selections - Invert - Delete - Select none
Move this under the frame layer
Effects - Texture Effects - Weave
Gap Size 3, Width 3, Opacity 20, Weave and Gap colour is White, Fill gaps checked
Click inside the frame again with your magic wand
Selections - Modify - Expand by 5
Open the tube you are using, Resize if necessary
Place in the frame
Selections - Invert - Delete
Move this under the frame
Paste the tube you are using again and resize if the original one was
Place on top of the frame, exactly over the original
Erase any over hanging parts
Open flower 7 and paste on your canvas
Image - Resize by 10 and Sharpen
Place on the top right hand side of the frame
Duplicate and place on the bottom left hand side of the frame
Open rose 1 and paste on your canvas
Image - Resize by 20 - Sharpen
Place on the top left hand side of the frame
Duplicate and place on the bottom right hand side of the frame
Open flower 1 and paste on your canvas
Image - Resize by 10 - Sharpen
Duplicate 3 times and place around the frame
Merge these layers together
Open butterfly 1 and paste on your canvas
Image - Resize by 30 - Sharpen
Place on top of the rose
Layers - Duplicate - Image - Mirror and place on the other rose
Open Swirl 1 and send to the bottom of the canvas
Image - Resize by 70 - Sharpen
Duplicate - Image - Mirror
Merge these 2 together
Copy n Paste paper 5 as a new layer
Add a mask of choice
Layers - Duplicate n place under the original mask
Merge these 2 together
Give everything a drop shadow
Merge layers Visible
Add all correct copyright n licence numbers
Crop if needed
Done!

No comments:
Post a Comment