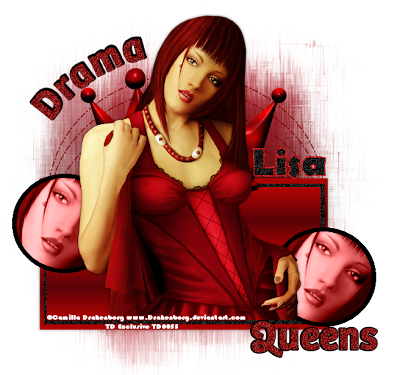
I am using the gorgeous Camilla Drakenborg Exclusive she made for Taggers Den
This is unfortunately not for sale but you can find her awesome work HERE
I am using the Template by Foxy made exclusively for the blog which you can find HERE
Mask of Choice
Font of Choice
Open the template
Open the tube you are using
On the template press shift d to duplicate and delete the original
Delete the copyright info layer and the background layer
Canvas Size - 700x700
On your colour pallette
Change the Foreground to a lighter colour from your tube
Change the Background to a darker colour from your tube
Gradient - Foreground/Background
Linear - Angle 0 - Repeats 3
Select layer 4
Selections - Select all - Float - Defloat
Add a new raster layer
Floodfill with the gradient you have just made
Selections - Select none
Delete layer 4
Click on layer 2
Selections - Select all - Float - Defloat
New raster layer and floodfill with the same gradient as before
Select none and delete layer 2
Click on layer 3
Selections - Select all - Float - Defloat
New raster layer and floodfill with black
Select none and delete layer 3
Grab your magic wand and select
Adjust - Add/Remove - Noise - Add Noise
Uniform - 60
Paste the tube you are using as a new layer
Position in the centre of the canvas
Use the selection tool to erase the overhanging parts of your tube
Click on layer 12
Move over to the left of the canvas
Using your deform tool, angle it so it looks as if its going round the crown
Do the same with the shadow layer
Move the queens layers - 15 and 16 down and to the right a little
See my tag for placement
Click on layer 9
Selections - Select all - Float - Defloat
Add a new raster layer and using the same gradient pattern as before but this time change the repeats to 9
Select None and Delete layer 9
Effects - 3D Effects - Inner Bevel - Default settings number 2 Bevel
Using your magic wand
Click on layers 8 and 6
Modify by 2
Add a new raster layer and floodfill with black
Select None and Delete layers 8 and 6
Open a close up of your tube
Paste on your canvas and resize if needed
Grab your magic wand and click inside the circle layers 7 and 5 - Modify by 1
Move your tube to where you would like it to go
When happy with your placements
Selections - Invert - Delete on your tube layers
Move under the frame layers
Change the blend mode to Luminance Legacy
Grab your magic wand and click on layers 11 and 15
Selections - Select all - Float - Defloat
Add a new raster layer and floodfill with black
Select None and delete the original layers
Click on layers 12 and 16
Adjust - Add/Remove - Noise - Add Noise
Uniform - 60
Add a new raster layer and send to the bottom
Add a colour or gradient of your choice
I used the same settings as before
Layers - New mask from image - Merge Group
Add drop shadows to your layers
Add your copyright and licence numbers
Save as a png
Add ya name and we are done!

No comments:
Post a Comment