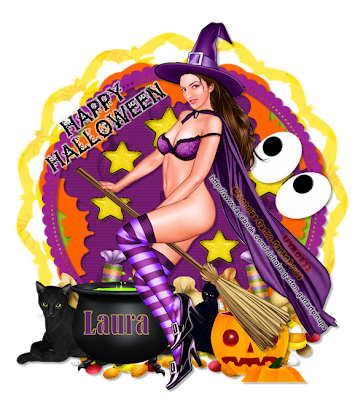
I am using the art of Nicholas Garton aka GartArtPinUps which you can find HERE
I am using Laura's Designz part of the HUGE collab Pumpkins and Candy by the awesome designers of Heartbeatz Creationz and you can find that HERE
Mask of Choice
Font of Choice
Open a new image 700x700
Open Element 10 and paste as a new layer
Resize by 80 and Sharpen
Position in the centre
Open Element 34 and paste as a new layer
Resize by 90 and Sharpen
Position over the orange frame
Click inside the purple frame with your magic wand
Modify by 3 - Copy and Paste Paper 1 as a new layer
Selections - Invert - Delete - Select None - Move under the frame
Click inside the orange frame with your magic wand
Modify by 3 and paste Paper 3 as a new layer
Position - Selections - Invert - Delete - Select None
Move under the frame
Effects - Texture Effects - Blinds - Width 5 - Opacity 11 - Black - Horizontal
Open Element 38 and paste as a new layer
Resize by 70 and Sharpen
Duplicate about 6 times and position inside the purple paper
Merge them down when happy
Open Element 4 and paste as a new layer
Image - Mirror - Resize by 30 and Sharpen
Position on the bottom left of the frame
Open Element 12 and paste as a new layer
Resize by 50 and Sharpen
Position along the bottom of the frames
Duplicate and position next to the original
See my tag for placement
Merge the candy layers Down
Open Element 13 and paste as a new layer
Resize by 30 and Sharpen
Position on the cat on the left of the tag
Open Element 19 and paste as a new layer
Resize by 30 and Sharpen
Position on the right of the tag
Open your tube as a new layer
Position in the centre - resizing if necessary
Open Element 17 and paste as a new layer
Image - Mirror - Resize by 50 and Sharpen
Position on the right of the frames
Using your deform tool - angle it so it goes along with the frame
Open Element 43 and paste as a new layer
Resize by 40 and Sharpen
Using your deform tool - angle it to the left so it fits the frame
Open Paper 4 and paste as a new layer
Send to the bottom and apply a mask of choice
Merge Group - Apply drop shadows to your layers
Merge Visible
Add correct copyright and licence numbers - Merge Down - Save as a png - Add your name - Save again - Done

No comments:
Post a Comment